// ================================================================================================
/*
* File : RotaryEncoder.cpp
* Created : August 3, 2016
* By : CJ van der Hoeven
*
* Purpose : Implementation of an interface to a rotary encoder
*
* Featuring : Rotary encoder with push-button
* Detection of rotation and speed
* Detection of button clicks
* Supports multiple rotary encoders in a single system.
*/
#include <math.h>
#include <avr/interrupt.h>
static const uint16_t Delay_1 = 300; // Duration for 'slow' rotations.
static const uint16_t Delay_2 = 200; // Duration for 'fast' rotations
static const uint16_t Delay_3 = 5000; // Minimum duration of 'Long press".
static const uint16_t Delay_4 = 10000; // Max value of duration counter.
// We use a class definition so we can declare multiple rotary encoders.
// - Use one object per encoder.
class RotaryEncoder
{
public:
RotaryEncoder()
{ m_Armed = false;
m_PinStatus = 0x00;
m_Debounce = 100;
}
// Return true if the rotary button was pressed.
bool Button(); // Short Press ( < 500 mS)
bool LongButton(); // Long Press ( > 500 mS)
// Return NrClick rotation since last check.
// Positive / Negative depending on direction.
int16_t GetRotation();
bool GetRotation(int16_t &Delta);
// Update 'Value' using rotary movement, but stay within range Min-Max
// - No display updates. Just the value is updated.
// - Return true when value was changed.
bool UpdateValue (uint8_t &Value, uint8_t MinValue, uint8_t MaxValue);
bool UpdateInt (uint16_t &Value, uint16_t MinValue, uint16_t MaxValue);
bool UpdateDouble(double &Value, double MinValue, double MaxValue, double Delta);
// Clear the status of the rotary encoder. Discard Buttons and movement.
void Clear();
// Count the rotation clicks.
// - Positive for ClockWise rotation,
// - Negative for CounterClockWise
int16_t m_Rotation; //< Number of rotation clicks
// Register current pin status from timer interrupt.
// Bits are active low.
// - A = 0b00000001
// - B = 0b00000010
// - S = 0b00000100
void Update(uint8_t PinStatus);
// m_PinStatus retains the status of the pins for the rotary encoder
// Are used to detect which pins have changed
// - Can be used by application
// - A = 0b00000001
// - B = 0b00000010
// - S = 0b00000100
uint8_t m_PinStatus;
private:
uint8_t m_Armed; //< State for Rotation
uint16_t m_Timer; //< Timer for Rotation speed
int8_t m_Button; //< Indicates that button was pressed. Code depends on Duration.
int8_t m_Debounce; //< Debounce counter.
uint16_t m_Duration; //< Count duration of button press.
};
// Handle Rotary status.
// - Pin status in lower 3 bits : SAB, Active Low.
// - Please note : Hardware is connected as SBA, but actual encoder produces SAB
// - Perhaps these chinese encoders have pins A and B swapped!
void RotaryEncoder::Update(uint8_t PinStatus)
{ // Rotary movement:
// - ClockWise : 11 - 01 - 00 - 10 - 11 (with actual chinese encoders).
// - CounterClock : 11 - 10 - 00 - 01 - 11 (with actual chinese encoders)
uint8_t Rotary = PinStatus & 0b00000011;
// Check Rotary AB
if ((m_Armed == 0) && (Rotary == 0b0000000))
{ // Both pins Low (contacts closed) indicates middle-of-click.
m_Armed = 1;
}
if (m_Armed && (Rotary == 0b00000011))
{ // Check previous value to determine direction.
// - Both pins high indicates idle position.
// Derive increment from duration.
// - Faster movements have more effect (bigger steps).
uint16_t Increment = 1;
if(m_Timer > Delay_1) // Slower than 10 clicks per second ?
{ Increment = 1; //
}
else if(m_Timer > Delay_2) // Slower than 20 clicks per second ?
{ Increment = 5; // Big steps for fast movements
}
else
{ Increment = 10; // SuperBig steps for ultrafast movements
}
if((m_PinStatus & 0b00000011) == 0b00000010)
{ // Moving forwards
m_Rotation += Increment;
}
if((m_PinStatus & 0b00000011) == 0b00000001)
{ // Moving backwards
m_Rotation -= Increment;
}
m_Armed = false;
m_Timer = 0;
}
m_PinStatus = Rotary; // Register new Pin Status
// Also Check button
// -- Button is bouncing quit a bit
// -- Debouncing required.
if(PinStatus & 0b00000100) //< Check Switch
{ // Pin High : Button switch open
// Button-release stable: Allow new button-press.
if(m_Debounce < 0) // Counter started at -100
{ m_Debounce += 1; // Count interrupts with switch open
}
if(m_Debounce == 0) // Counter started at -100
{ if(m_Duration < Delay_3) // Less than 500 ms :
{ m_Button = 1; // Short Press
}
m_Debounce = 100; // Count interrupts with switch open.
}
if(m_Debounce > 0)
{ m_Debounce = 100; // Restart counter when Switch is open.
}
}
else
{ // Pin Low : Button switch closed
// Button active (=Low)
if(m_Debounce > 0) // Countdown started at 100
{ m_Debounce -= 1;
}
if(m_Debounce == 0) // Register Click after 100 interrupts (50 ms)
{ m_Debounce = -100;
m_Duration = 0; // Start new Duration counter.
}
if(m_Debounce < 0) // Keep it low as long as switch remains closed.
{ m_Debounce = -100;
if(m_Duration == Delay_3)// Notify user when the button is down long enough
{ m_Button = 2; // Long Press.
}
if(m_Duration < Delay_4) // Up to a Max.
{ m_Duration += 1; // Count duration of button Down
}
}
}
// Increment timer counter at every interrupt.
// - So we get time between clicks (5000 increments per second)
if (m_Timer < 1000)
{ m_Timer += 1;
}
}
// Interface functions to check if a button is pressed.
// Return true if the rotary button was pressed
bool RotaryEncoder::Button()
{ if(m_Button == 1)
{ // Clear button, so it is used only once.
// Please note: The surrounding if() is required here because clearing too often may
// clear the Button before it is used.
// I.E. when ISR writes a new button between ButtonRead and ButtonClear.
m_Button = 0;
return true;
}
else
{ return false;
}
}
// Interface functions to check if a button is pressed.
// Return true if the rotary button was pressed
bool RotaryEncoder::LongButton()
{ if(m_Button == 2)
{ // Clear button, so it is used only once.
// Please note: The surrounding if() is required here because clearing too often may
// clear the Button before it is used.
// I.E. when ISR writes a new button between ButtonRead and ButtonClear.
m_Button = 0;
return true;
}
else
{ return false;
}
}
// User function to check if the rotary is turned.
// Return signed Count
// < 0 : Nr clicks, turned backwards
// = 0 : No movement
// > 0 : Nr clicks, turned forwards
int16_t RotaryEncoder::GetRotation()
{ if(m_Rotation)
{ // Yes, Action:
int16_t Rotation = m_Rotation; //< Register current value
m_Rotation = 0; //< Clear
return Rotation; //< Return current value to application
}
else
{ return 0; //< No movement
}
}
bool RotaryEncoder::GetRotation(int16_t &Delta)
{ Delta = GetRotation();
return (Delta != 0);
}
// Clear the status of the rotary encoder. Discard Buttons and movement.
void RotaryEncoder::Clear()
{ m_Rotation = 0;
m_Button = 0;
}
// ================================================================================================
/*
* Main.cpp
*
* Created : 2018-21-10
* Author : Kees
* Purpose : Firmware for Inductor tester.
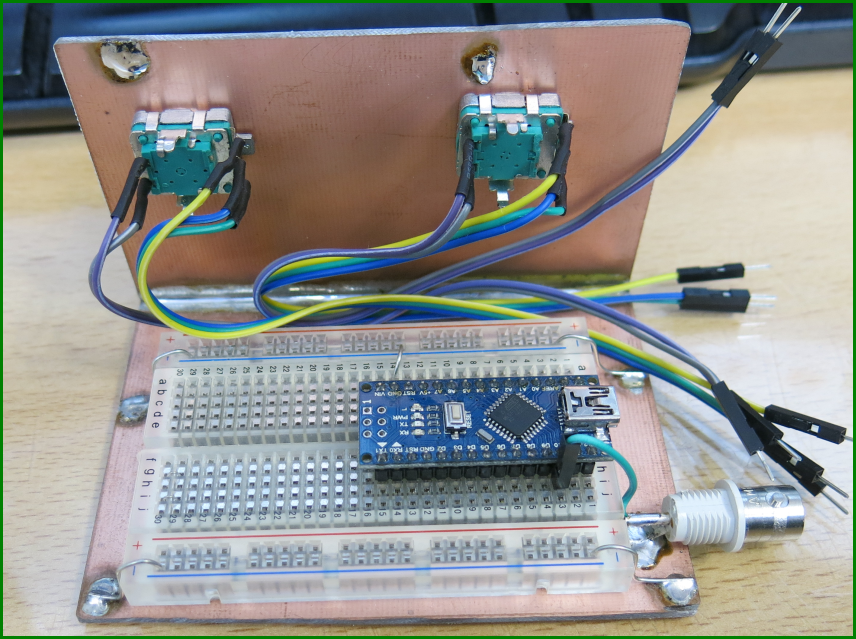
* - Using rotary encoders:
* MyRotary1 : Set Pwm frequency.
* MyRotary2 : Set Pwm PulseWidth.
*
* - AtTiny24
*
* Schematics : Projects\Kicad\InductorTester
*/
#include <avr/io.h>
#include <avr/interrupt.h>
#include <avr/pgmspace.h>
#include <avr/sleep.h>
// ================================================================================================
// Frequency to be decided.
// -- But we need high speed to create short pulses.
// -- Lets start with 1 MHz.
#define F_CPU 1000000
// ================================================================================================
// Hardware definition (Pin mapping).
// ==================================================================
// PWM Output pin
// -- PB2, D10 : (PWM through OC1B), Active Low (using TC426 Mosfet driver).
// -- Variable Frequency and Duty cycle to control led power.
static const uint8_t PIN_PWM_OUT = 0b00000100; // PB2
// ================================================================================================
struct TIMER_DSCR
{
uint16_t m_Started;
void Start()
{ m_Started = millis();
}
// Check if 'Duration'
bool Sync(uint16_t Duration)
{ if( (((uint16_t)millis()) - m_Started) >= Duration )
{ m_Started += Duration;
return true;
}
else
{ return false;
}
}
};
TIMER_DSCR Timer;
// ================================================================================================
// Instantiate a couple Rotary encoder handlers
RotaryEncoder MyRotary1; // To set Pwm Frequency
RotaryEncoder MyRotary2; // To set Pwm PulseWidth
// We have a single interrupt handler for our 2 rotary encoders.
// - To be called from a timer interrupt at regular intervals.
// - Should be fast enough to detect all rotary pulses.
// - This handler will check the encoder's I/O pins and derive rotation movements.
//
// This is not included in the rotary library function because:
// - Here we can define as many encoders as needed in an application..
// - And we provide actual link between processor pins and encoder switch.
void RotaryInterruptHandler()
{
// Setup I/O port for Rotary encoder SW2 SW1
DDRD &= ~0b11111100; // Set Inputs SW2:SBA SW1:SBA
PORTD |= 0b11111100; // Enable Pullups
MCUCR &= ~(1 << PUD); // Enable all pull-up functions.
// First read rotary encoder.
uint8_t PinStatus = PIND & 0b11111100; // PD.7 .. PD.2
// SW1 :
MyRotary1.Update(PinStatus >> 2); // Rotary1 uses PD.4 = S, PD.3 = B, PD.2 = A
// SW2 :
MyRotary2.Update(PinStatus >> 5); // Rotary2 uses PD.7 = S, PD.6 = B, PD.5 = A
}
// ================================================================================================
// We use Timer0 as time base for frequency measurement.
// -- Should generate interrupts at every 100 uSec
//
// And we use a 16-bit timer 1 for the Pwm Engine.
// -- So we get a 16-bit frequency range.
//
// - Clock frequency = 1 MHz (Prescaler = 8)
// - Use OCR1A to set Frequency, Clear on Compare Match
// -- WGM = 010 : CTC, Fast PWM
// - Use OCR1B to generate PWM wave form
// COM0B = 11 : Set at Compare Match, Clear at BOTTOM.
// -- This mode allows Zero pulse output, I.E. Mosfet off.
// -- Active Pulse width : OCR1A - OCR1B
// Lowest possible frequency = 20 Hz, 50 ms
static const uint16_t MaxCount = 50000;
void StartPwmEngine()
{ // ====================================================================
// Set TIMER1 to generate PWM signal.
TCCR1A = (0b11 << WGM10) // CTC (on OCR1A), Fast PWM.
+ (0b11 << COM1B0) // TC427 (Active High) : PWM on OC1B (PB2) Set on Compare Match, Clear at Bottom.
// + (0b10 << COM1B0) // TC426 (Active Low) : PWM on OC1B (PB2) Clear on Compare Match, Set at Bottom.
+ (0b00 << COM1A0); // Disable PWM on OC1A
TCCR1B = (0b010 << CS10) // Clock divide by 8 --> 2 MHz
+ (0b11 << WGM12) // CTC (on OCR1A), Fast PWM.
+ (0b0 << ICNC1) // Not used
+ (0b0 << ICES1); // Not used
TCCR1C = (0b0 << FOC1B)
+ (0b0 << FOC1A);
// We use a variable PWM frequency, as set by OCR1A
// And a Pulse duration set by OCR1B
OCR1A = MaxCount; // Set Pwm Frequency.
OCR1B = MaxCount; // Set Pwm Pulse width off initially.
TIMSK1 = (0 << TOIE1) // Disable all interrupts on Timer 1
+ (0 << OCIE1A)
+ (0 << OCIE1B)
+ (0 << ICIE1);
DDRB |= PIN_PWM_OUT; // Enable output for PWM OC1B.
}
#define NR_ENTRIES(a) (sizeof(a)/sizeof(a[0]))
void SetPwmPower(uint16_t PwmPeriod, uint16_t PulseWidth)
{ // Prevent extended pulse output when changing frequency.
// - Better to miss a pulse than to generate long pulse.
if(PwmPeriod < OCR1A)
{ // Setting Shorter period : Update frequency first.
// - Update frequency first
OCR1A = PwmPeriod;
OCR1B = PwmPeriod - PulseWidth;
}
else
{ // Setting longer period time:
// - Update pulseWidth first
OCR1B = PwmPeriod - PulseWidth;
OCR1A = PwmPeriod;
}
DDRB |= PIN_PWM_OUT; // Enable output for PWM OC1B.
}
// ================================================================================================
struct FREQUENCY_DSCR
{ uint16_t m_Period; // MicroSeconds between pulses, 0 .. 65535
};
// Higher Index gives higher frequency
static const FREQUENCY_DSCR FrequencyTable[] PROGMEM =
{ // Pwm Frequency
{ ( F_CPU / 20 ) }, // 20 Hz (50000 uSec)
{ ( F_CPU / 30 ) },
{ ( F_CPU / 50 ) },
{ ( F_CPU / 100 ) },
{ ( F_CPU / 200 ) },
{ ( F_CPU / 300 ) },
{ ( F_CPU / 500 ) },
{ ( F_CPU / 1000 ) }, //< Default
{ ( F_CPU / 2000 ) },
{ ( F_CPU / 3000 ) },
{ ( F_CPU / 5000 ) },
{ ( F_CPU / 10000 ) },
{ ( F_CPU / 20000 ) },
{ ( F_CPU / 30000 ) },
{ ( F_CPU / 50000 ) }, // 50 kHz (20 uSec)
};
struct PWM_DSCR
{ uint16_t m_PulseWidth; // Actual Pulse width from table
uint16_t m_StepSize; // Step-Size for fine-tuning
// - Typically 1% of m_PulseWidth (if possible)
};
// Higher Index gives larger pulses
static const PWM_DSCR PulseWidthTable[] PROGMEM =
{ // in uSecs (counter clocks)
{ 0, 1 },
{ 1, 1 },
{ 2, 1 },
{ 3, 1 },
{ 5, 1 },
{ 10, 1 },
{ 20, 1 },
{ 30, 1 },
{ 50, 1 },
{ 100, 1 },
{ 200, 2 },
{ 300, 3 },
{ 500, 5 },
{ 1000, 10 },
{ 2000, 20 },
{ 3000, 30 },
{ 5000, 50 },
{ 10000, 100 },
{ 20000, 200 },
{ 30000, 300 },
{ 50000, 500 },
};
// =================================================================================================================
void setup()
{
// put your setup code here, to run once:
Serial.begin(115200);
// Set Pin Direction register
DDRB |= PIN_PWM_OUT; // Enable output for PWM OC1B.
StartPwmEngine();
Timer.Start();
}
void loop()
{
if(Timer.Sync(1))
{ RotaryInterruptHandler();
}
// Set initial values at Start-up
static uint8_t FrequencyIndex = 7; // 1000 Hz
static uint8_t PulseWidthIndex = 0; // No pulse at startup.
// Units of 1 uSec.
// - Range 0 .. 50000 (Stay within 16 bits value).
static uint16_t PwmPeriod = pgm_read_word(&FrequencyTable[FrequencyIndex].m_Period);
static uint16_t PwmPulseWidth = 0; // Duration of the Pwm Pulse.
static bool SetFinePulseWidth = false;
int16_t Delta; // To see direction and magnitude to Rotary encoder
// ==========================================================================================
// Update PWM frequency
if(MyRotary1.GetRotation(Delta))
{
if(Delta < 0)
{ if(FrequencyIndex > 0)
{ FrequencyIndex -= 1;
}
}
if(Delta > 0)
{ if( (FrequencyIndex + 1) < NR_ENTRIES(FrequencyTable))
{ FrequencyIndex += 1;
}
}
// Update PWM timer for new frequency
PwmPeriod = pgm_read_word(&FrequencyTable[FrequencyIndex].m_Period);
SetPwmPower(PwmPeriod, PwmPulseWidth);
float Frequency = 2000000 / PwmPeriod;
Serial.print("f = "); Serial.println(Frequency);
}
// ==========================================================================================
// Update PWM Pulse Width
if(MyRotary2.Button())
{ // Rotary-Switch toggles between Fine and course
SetFinePulseWidth = (SetFinePulseWidth ? false : true);
if(SetFinePulseWidth)
{ Serial.println("w = fine");
}
else
{ Serial.println("w = coarse");
}
}
if(MyRotary2.GetRotation(Delta))
{ // Update Pwm PulseWidth
if(SetFinePulseWidth)
{
// Get StepSize from Table. Use as Fine-tuning.
uint16_t StepSize = pgm_read_word(&PulseWidthTable[PulseWidthIndex].m_StepSize);
if(Delta < 0) // Turning CounterClock-wise
{ // Down to Pulse-width = 0
if(PwmPulseWidth >= StepSize)
{ PwmPulseWidth -= StepSize;
}
else
{ PwmPulseWidth = 0;
}
}
if(Delta > 0) // Turning Clock-wise
{ // Up to 100 % pulse-width
if( (PwmPulseWidth + StepSize) <= PwmPeriod)
{ PwmPulseWidth += StepSize;
}
else
{ PwmPulseWidth = PwmPeriod;
}
}
}
else
{ // Coarse mode. Set Index and get new value from table
if(Delta < 0)
{ if(PulseWidthIndex > 0)
{ PulseWidthIndex -= 1;
}
}
if(Delta > 0)
{ if( (PulseWidthIndex + 1) < NR_ENTRIES(PulseWidthTable))
{ PulseWidthIndex += 1;
}
}
PwmPulseWidth = pgm_read_word(&PulseWidthTable[PulseWidthIndex].m_PulseWidth);
}
// Update PWM timer for new frequency
SetPwmPower(PwmPeriod, PwmPulseWidth);
float PulseWidth = 0.5 * PwmPulseWidth;
Serial.print("pw = "); Serial.println(PulseWidth);
}
}